How I Use Luminar Neo for My Street Photography

My Photo Editing Backstory
I’ve been using Skylum’s Luminar AI, and its successor, Luminar Neo, since before the public launch dates for each of these apps. As someone who has had to come to terms with the fact that he’s always late to the game in regard to most technical innovations, I made it a point to jump aboard the artificial intelligence ship before the official passenger list was tallied. Luminar AI was the world’s first photo editor that was powered 100% by artificial intelligence. My intention was to not only be able to claim that I was one of the early adopters but more importantly, see if it was something I could incorporate into my post-processing. I initially thought that I’d be able to use this new AI stuff for a few things. But to my more than a pleasant surprise, it’s more of an exception to the rule if I omit it entirely from my photo editing workflow.
Looking back over the past seven years, I’ve never settled on a permanent photo editing workflow or photo editing app, for that matter. In the beginning, when I crossed over into the mirrorless camera world with the Sony A6000, a good chunk of my photo editing techniques were geared toward corrective editing, mainly when it came to low light situations and battling noise. At the time, I wasn’t happy at all with the prospect of anything but a very clean-looking image. And I had to rely heavily on Photoshop and third-party plugins to achieve the aesthetic I sought. When I went full frame with the Sony A7iii, I found myself in an entirely different world. Suddenly, I didn’t have to corrective edit so much. I was free to explore other looks, and styles, and dig deep until I discovered that I really was a frustrated artist masquerading as a photographer. I no longer needed this clean look, which I now think was really a form of aesthetically-inclined OCD.
Although my pursuit has become producing limited edition fine art prints, I still have a passion for street photography and always will. Part of the reason is that I source more than 90% of my prints from street photography, or public photography if you prefer. And now more than ever, image compositing is front and center in my workflow, whether it’s simply overlaying a subtle lighting effect in Luminar Neo or applying multiple layers of images, textures, and other digital tidbits. Apart from Photoshop and Lightroom, Luminar Neo has sealed the deal to complete my Holy Trinity of go-to apps for all my post-processing needs.
Why I Use Luminar Neo as a Photoshop Plugin
Someone will eventually ask me why I use Luminar Neo as a plugin versus a standalone app if I think Neo is so great. My answer is analogous to camera modes and the differences between your favorite semi-auto mode (Shutter Priority, Aperture Priority, etc.) and Manual Mode. I view Luminar Neo as my favorite go-to semi-auto mode that allows me to make effective and creatively dramatic changes without a lot of fuss and in a short amount of time. After nearly a year of using it, I know its strengths and weaknesses. I usually know what sliders I’ll be working with before I import the image into Luminar Neo. I’ve got a system. And it works very well for me.
I think of Photoshop and Lightroom (and Adobe ACR) as my Manual Mode. When I want complete control over all the minutest of details or want to experiment with new photo editing techniques, nothing beats Photoshop for overall capability for photo editing. In fact, the two steps in my current workflow don’t change: I import into Lightroom and do some editing and then I export the image to Photoshop as a Smart Object to continue. And 9.5 times out of 10, I’ll visit Luminar Neo for some creative touches or to begin some serious compositing. After those initial steps, it’s back to Photoshop to save and export or to continue editing. It’s not uncommon for me to go back into Luminar Neo two or three times in a layer stack to build up effects. It just depends on the image.
Could I use Luminar Neo as a standalone app without Photoshop and Lightroom? Absolutely. In fact, there’s an experiment I’m going to try in the coming weeks when I plan on shooting street photography with my new Sony ZV-1 and editing exclusively in Luminar Neo. My theory is that I could get by quite easily only using Luminar Neo. But I’ll be able to confirm that for sure after I run my little experiment.
In the meantime, I’ll show you how I use Luminar Neo as a Photoshop plugin for my street photography using one recent image as an example.
How I use Luminar Neo as a Plugin for Photoshop
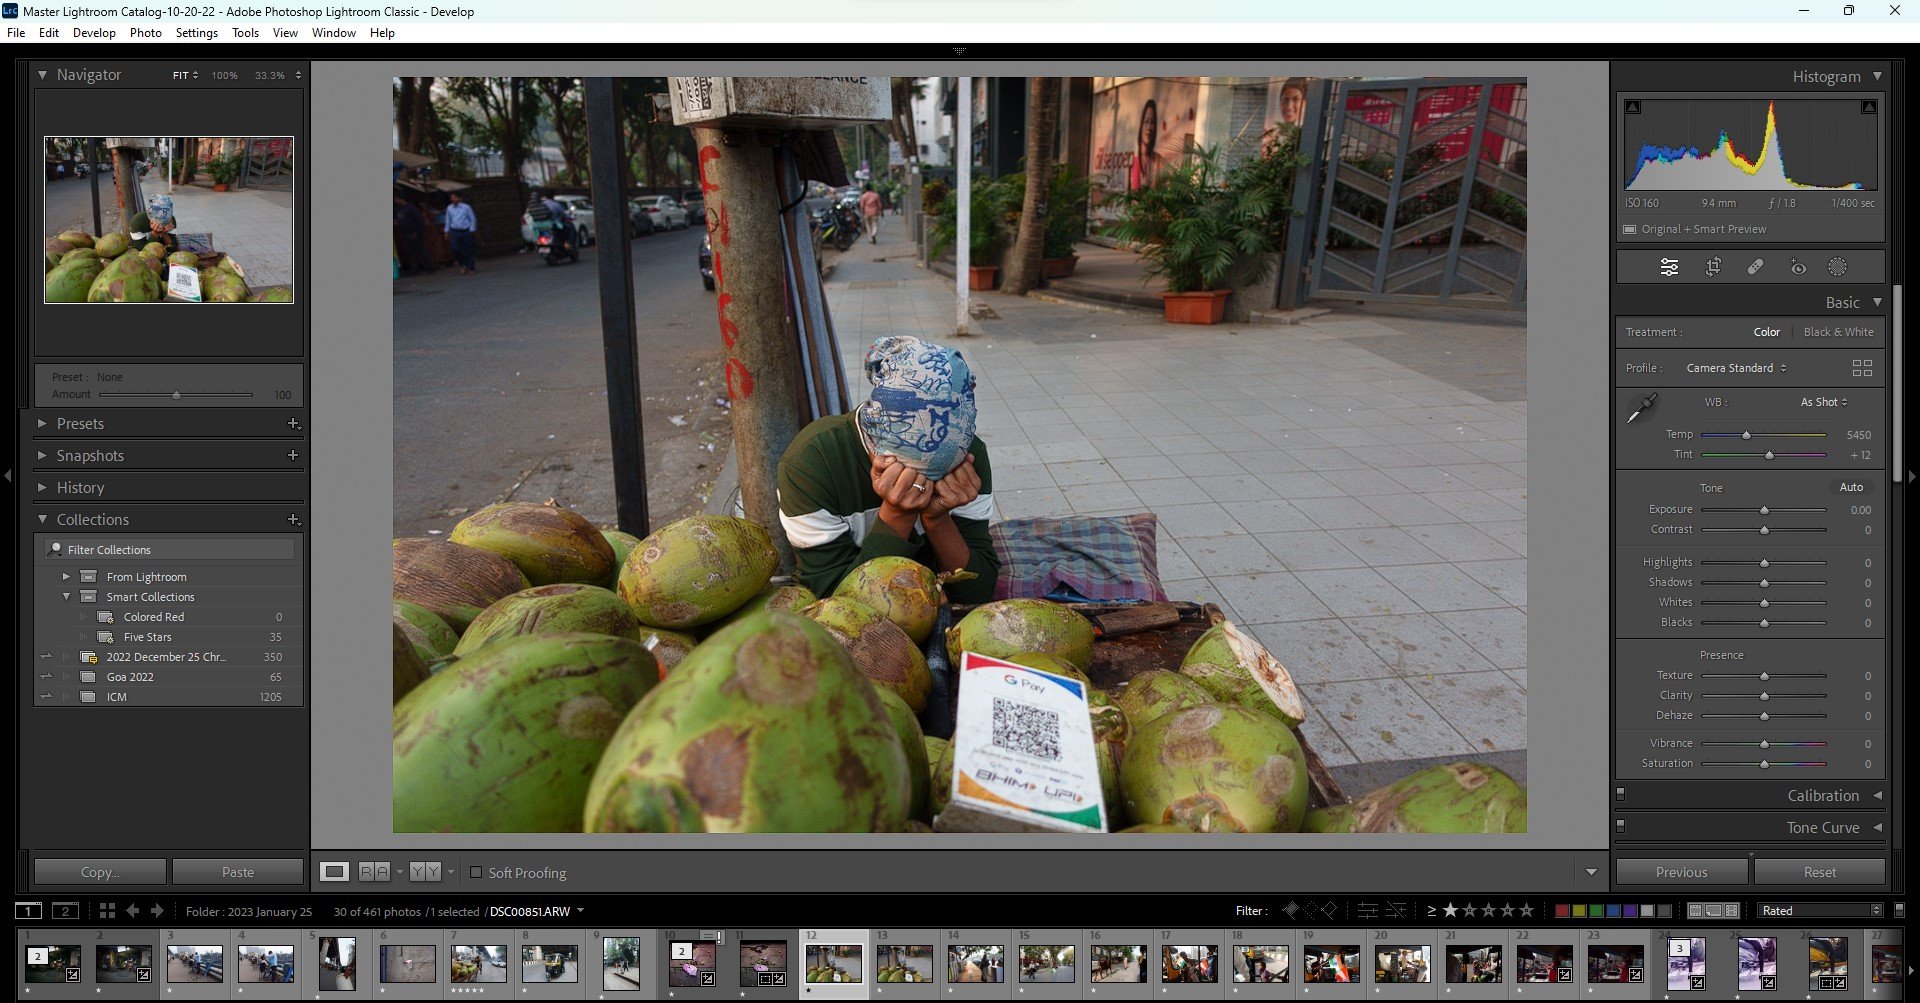
The above image is the Raw file after I imported it into Lightroom. I shot it on my Sony ZV-1 using the Highlight metering mode, which effectively darkens the scene in order to expose for the highlights. In this image, the effect isn’t as dramatic because the lighting is softer. Typically, I’ll use Lightroom to create multiple masks to change exposure, contrast, and color values in order to make the subject stand out a bit more. I won’t go into great detail because a step-by-step, even for a simple non-composite image like this, would make for a much longer article than this is already.
1. Lightroom Edits

Apart from the masks and light global edits, I applied a crop to remove some of the non-essential details. Now, I’m ready to export to Photoshop, which I’ll always do by right-clicking on the image and selecting the Open in Photoshop as a Smart Object option.
2. Photoshop Cleanup

With the image open in Photoshop, I’ll proceed to the next step in my workflow, which is cleaning up the background. I’ll do this by creating a blank layer and/or a copy of the layer to allow for the Patch Tool, which is just what I did for this image.

I used the Healing Brush, Clone Stamp, and Patch Tools to clean up the distractions in the background. I guess there’s no controlling my OCD afterall! But for me, it comes down to responsibility. If I’m creating a fine art image, which I intend this one to be even though I don’t plan on printing and selling it, then I’m responsible for every pixel in the image from corner to corner. And all of that crap in the background can be removed very easily with Photoshop tools. The same can’t be said for Luminar Neo yet, not with the same amount of control and results. But I’m sure that will change at some point in the future, either in Neo itself or in another AI app.
Next, I’ll create a Stamp Visible layer by pressing Shift + Ctrl + Alt + W. I took the screenshot before doing this step, but there would normally be a Stamp Visible layer sitting on top of the layer stack. It’s worth noting that I don’t ever convert these Stamp Visible layers into Smart Objects because what I’ve found is that when you start dealing with multiple Smart Objects, they all go through a rendering process whenever changes are made. This really chews up my computer’s memory and slows everything down needlessly. The workaround is to create a Preset in Luminar Neo if you think you’ll need those edits again. If I spent a lot of time editing an image, I might even create a Preset just in case Luminar Neo crashes on the export (which has been known to happen). Either way, I have all my edits saved if I need them again.
3. Luminar Neo: Enhance AI

The first tool that I always use in Luminar Neo is Enhance AI. I use it so much that it’s only one of two sliders that I saved to my Favorites at the top. For this image, I pushed the slider close to 50. This served to enhance the greens and the contrast to make for a richer image. According to Skylum, Enhance AI makes use of two tools that are “under the hood”, Accent AI (makes use of more than a dozen controls) and Sky Enhancer AI.
4. Luminar Neo: Structure AI
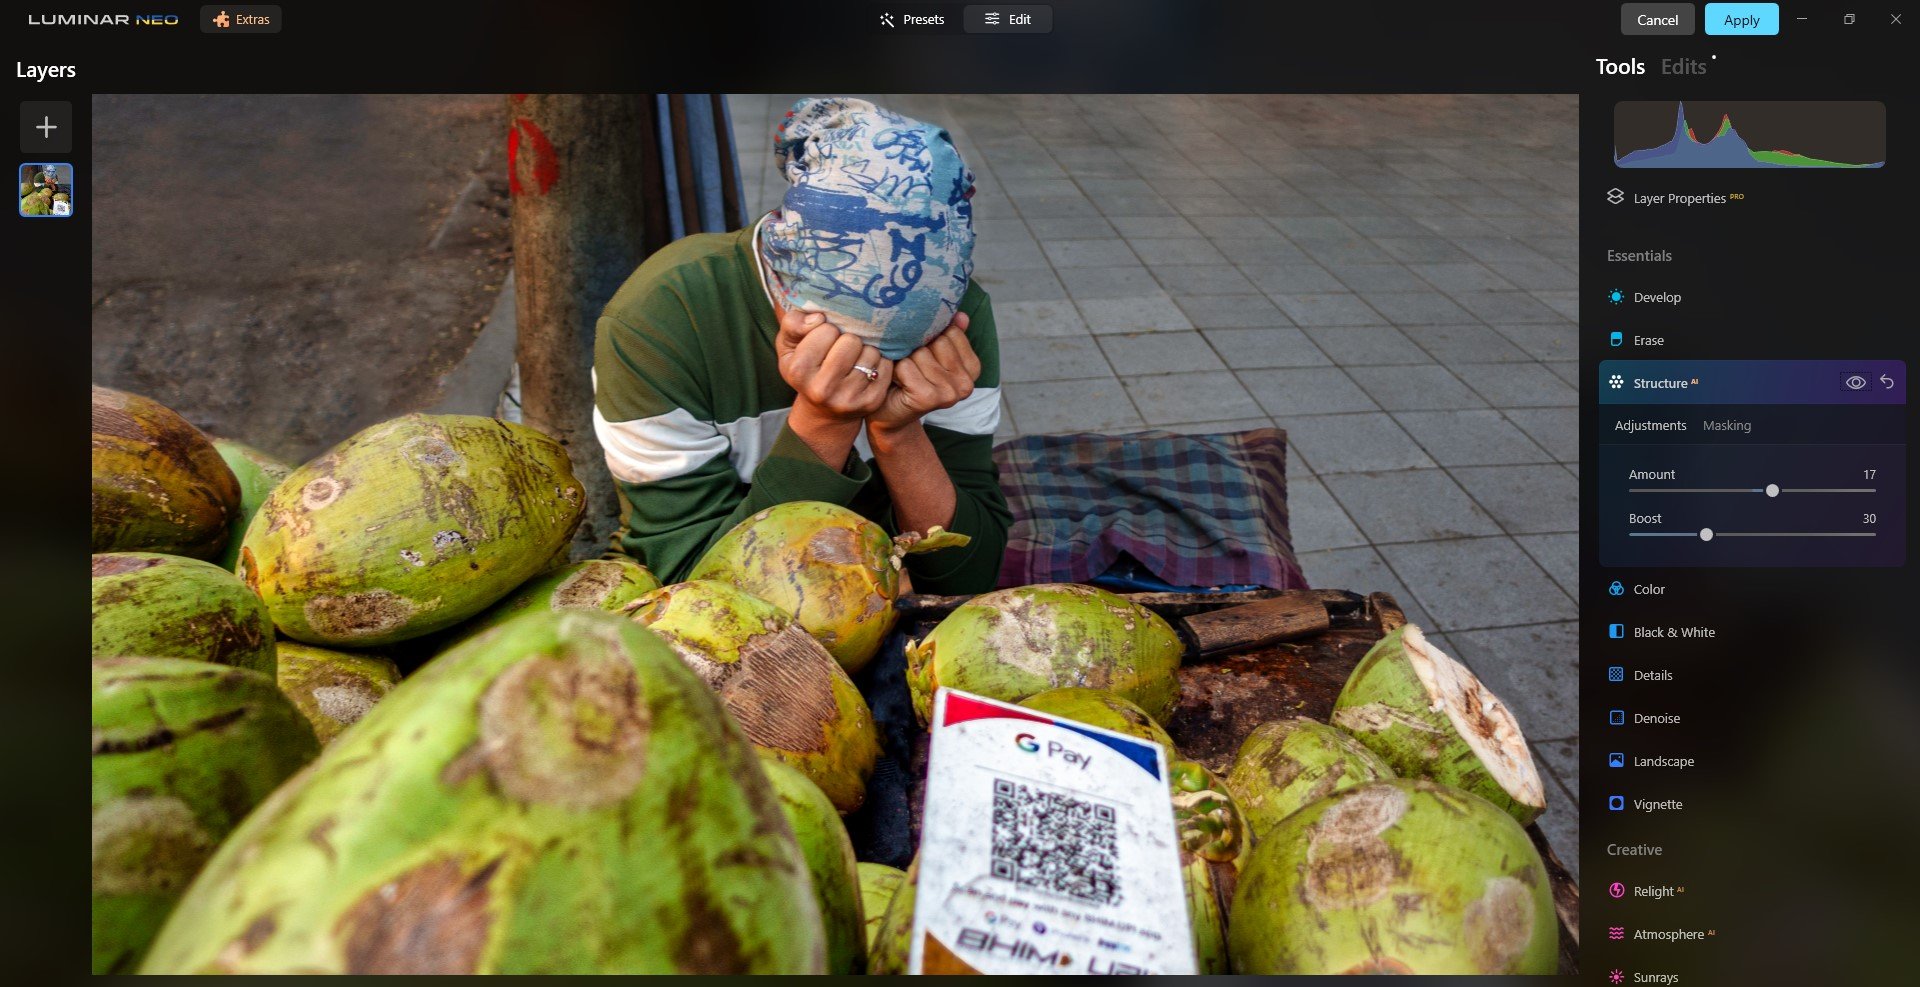
Structure AI is also a permanent fixture in my Luminar Neo workflow. You don’t have to push the two sliders very far to start seeing good results. I’ll often use the Amount slider minimally and use more of the Boost slider for the finer details. It may be difficult to see in the screenshots, but the coconuts as well as the pavement deep in the background start to pop. Structure, in general, is usually a good thing for me since I do a lot of healing there tend to be softer areas that are less defined. In this example, Structure AI acted like a coat of light cement on top of the blurred pixels to help it look more natural, at least to my eyes.
5. Luminar Neo: Details

The Details sliders are indispensable to me. They complement Structure AI perfectly by highlighting all details big and small. And if you don’t have a subscription that includes all the plugins, like Sharpen AI, or have purchased Sharpen AI separately, the Sharpen slider will help out the image as a finishing touch. You can also use the masking tools if you need to make targeted adjustments locally.
6. Luminar Neo: Vignette

I don’t always use Vignette, but when I’m dealing with just one individual then I tend to make use of it to draw the viewer’s attention just a little more. I’ll always feather any vignette and also add an Inner Light slider effect to make the subject pop.
7. Luminar Neo: Mood

I don’t always use Mood either but it’s fast becoming a tool that I use more frequently for many of my street shots to recolor my images, especially Long Beach. This particular LUT is very strong and a little dab will do ya every time. I only had to push the Amount slider to 25 and barely touched Contrast and Saturation. In my opinion, the Mood sliders and the Layers feature are two of Luminar Neo’s most creative and transformative tools. And if you work with AI art, this is positively the case if you want your work to stand apart from other AI generative art creators.
8. Luminar Neo: Supercontrast

Supercontrast never ceases to surprise me pleasantly. If I don’t use this feature for my street photography, it’s usually because I’m in a rush or I just plain forget about it. But if used correctly, it’s like adding a coat of resin to your image. Just compare this screenshot to the previous one. See how much richer it is with Supercontrast? The best way to master these sliders is to play with them for every image. I’ll tend to use all these sliders conservatively because you don’t have to push them very far to see results. For me, Supercontrast is a hidden gem tucked away at the bottom in the Professional tab. And it’s in the pro tab for a reason: it will simply make your street photography images better.
9. Luminar Neo: Layers

Layers is the single feature that elevates Luminar Neo to the heights of a professional photo editor in my book. Without it, I couldn’t composite images in Luminar Neo. Nor could I stack lighting effects and blend textures. Layers is absolutely essential to me, even if I make use of it lightly or not at all in some of my images. It’s a must-have, and I patiently waited for Skylum to add this feature before I could positively recommend Luminar Neo as a full-on creative photo editor to both amateurs and professionals. In this particular image, you probably won’t be able to tell a difference but the lighting effect that I added with just a touch of the Opacity slider served as the finishing touch. At this point, I could either save the edits as a preset or simply export the image back into Photoshop. I chose to export because all these steps I’ve written about are part of my routine workflow already.
10. Back to Photoshop for Finishing Touches and Exporting

I’ll note here that if you’re using Luminar Neo as a Photoshop plugin, then some of the features are disabled. One of them is Crop AI. As I mentioned, I’ll be experimenting with Luminar Neo as my exclusive photo editor later this year but in the meantime, I had to make my final crop in Photoshop, which was a last-minute decision. I felt the crop provided more drama by streamlining the viewer’s focus straight to the subject, from the G Pay barcode, through the coconuts, and to our presumably sad-looking subject, but whom I’m guessing was just trying to catch a nap since it was relatively early for a coconut vendor that morning.
I Highly Recommend Luminar Neo as a Creative Photo Editor
I’ve probably been the worst Skylum affiliate since I haven’t run any deals on my website or on social media until recently. That’s because I’m very reluctant to sell something unless I actually use it. Also, I have to love it and it has to be a major part of my workflow or creative process if I’m to take on the responsibility. This process took time. I wasn’t there with Luminar AI because it lacked Layers and a few other vital features that Luminar Neo has. Plus, Skylum continues to improve Luminar Neo and has been adding additional extensions regularly.
Here’s how my recommendations work:
If you’re new to photo editing and you don’t want to spend years learning complex programs like Photoshop, then pick up Luminar Neo. It’s easy to understand and you’ll be able to accomplish just about everything that you could want.
If you already use professional programs like Photoshop and want to use Luminar Neo as a plugin, definitely buy it. It will save you time, especially if you want to experiment and create complex presets.
I can’t yet recommend Luminar Neo as an exclusive photo editor for a professional yet. I’m not sure if it’s because I’m addicted to photo editing and experimenting with complex techniques or whether I could forgo that sort of thing and use Luminar Neo just for the essentials. I’d be curious to hear from any professionals out there who ditched their Adobe subscriptions and are using Luminar Neo exclusively for their businesses. If I don’t, I’ll be finding out for myself in good time.
If you’d like to pick up Luminar Neo for yourself, consider using one of my affiliate links. It doesn’t cost you anything more and I get a small cut to support my creative endeavors and to provide free content like this.