Mastering Photoshop Blend Modes: A Comprehensive Guide to Using Blend Modes for Fine Art Photography and Texturing
As one of the most powerful features in Photoshop, blend modes allow you to combine multiple layers in a variety of ways to achieve a wide range of effects. Whether you're a seasoned Photoshop pro or just starting out, understanding blend modes can take your images to the next level. In this article, we'll dive into the different groups and individual blend modes available in Photoshop, and explore how to use them to enhance your fine art images using textures.
Groups of Blend Modes
Photoshop's blend modes can be grouped into six different categories: Normal, Darken, Lighten, Contrast, Inversion, and Composite.
Normal Blend Mode Group
The Normal blend mode group contains the most basic blending modes, which are used for standard layer compositing. These blend modes include:
Normal: The default blend mode, which displays the layer as is.
Dissolve: This blend mode creates a speckled effect that can be useful for creating textures or adding noise to an image.
Darken Blend Mode Group
The Darken blend mode group contains blend modes that darken the base layer based on the luminance values of the blend layer. These blend modes include:
Darken: The Darken blend mode replaces the base layer's pixels with those of the blend layer when the blend layer is darker.
Multiply: This blend mode multiplies the luminance values of the base layer with those of the blend layer to produce a darker result.
Color Burn: Color Burn darkens the base layer and increases contrast based on the blend layer's luminance values.
Linear Burn: This blend mode also darkens the base layer but with more subtle results than Color Burn.
Lighten Blend Mode Group
The Lighten blend mode group contains blend modes that lighten the base layer based on the luminance values of the blend layer. These blend modes include:
Lighten: The Lighten blend mode replaces the base layer's pixels with those of the blend layer when the blend layer is lighter.
Screen: This blend mode multiplies the inverse of the luminance values of the base layer with those of the blend layer to produce a lighter result.
Color Dodge: Color Dodge lightens the base layer and decreases contrast based on the blend layer's luminance values.
Linear Dodge: This blend mode also lightens the base layer but with more subtle results than Color Dodge.
Contrast Blend Mode Group
The Contrast blend mode group contains blend modes that increase contrast based on the luminance values of the blend layer. These blend modes include:
Overlay: The Overlay blend mode combines the effects of the Darken and Lighten blend mode groups to increase contrast.
Soft Light: This blend mode is similar to Overlay but with more subtle results.
Hard Light: This blend mode is similar to Overlay but with more intense results.
Inversion Blend Mode Group
The Inversion blend mode group contains blend modes that invert the luminance values of the base layer based on the blend layer's luminance values. These blend modes include:
Difference: The Difference blend mode subtracts the blend layer's pixels from the base layer's pixels.
Exclusion: This blend mode also subtracts the blend layer's pixels from the base layer's pixels but with more subtle results than Difference.
Composite Blend Mode Group
The Composite blend mode group contains blend modes that are combinations of the other blend mode groups. These blend modes include:
Hue: The Hue blend mode combines the saturation and luminance values of the base layer with the hue of the blend layer.
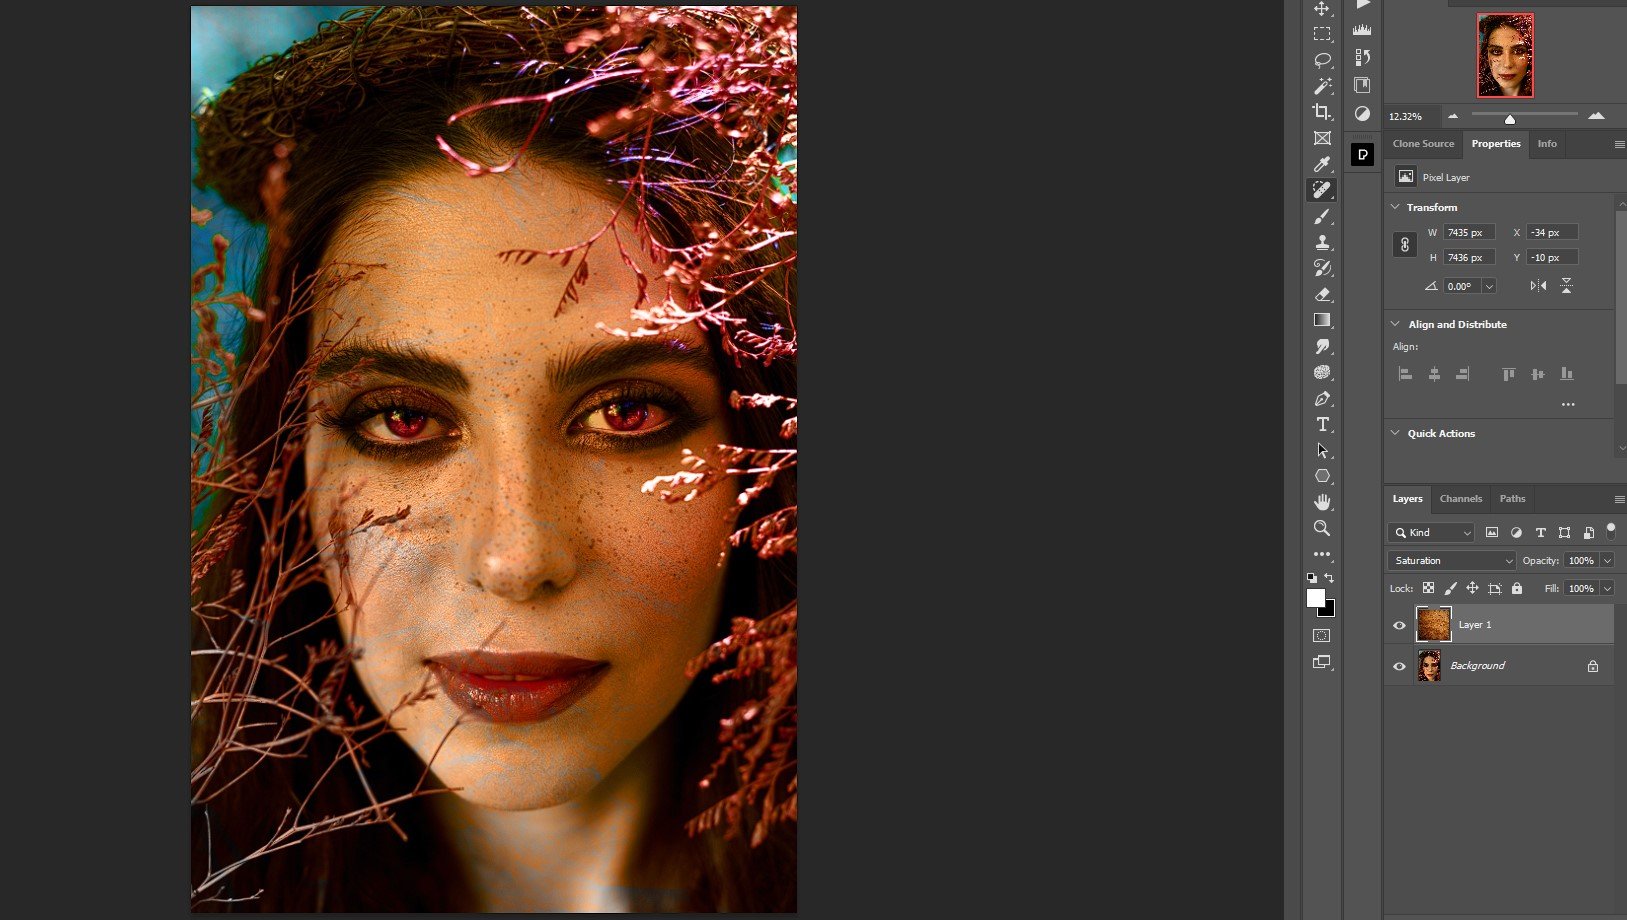
Saturation: This blend mode combines the hue and luminance values of the base layer with the saturation of the blend layer.
Color: The Color blend mode combines the luminance values of the base layer with the color of the blend layer.
Luminosity: This blend mode combines the hue and saturation values of the base layer with the luminance of the blend layer.
Individual Blend Modes
Now that we've explored the different groups of blend modes, let's take a closer look at each individual blend mode and its effects.
Normal: This blend mode simply displays the layer as is, with no blending or modification.
Dissolve: This blend mode creates a speckled effect that can be useful for creating textures or adding noise to an image.
Darken: This blend mode replaces the base layer's pixels with those of the blend layer when the blend layer is darker.
Multiply: This blend mode multiplies the luminance values of the base layer with those of the blend layer to produce a darker result.
Color Burn: Color Burn darkens the base layer and increases contrast based on the blend layer's luminance values.
Linear Burn: This blend mode also darkens the base layer but with more subtle results than Color Burn.
Lighten: The Lighten blend mode replaces the base layer's pixels with those of the blend layer when the blend layer is lighter.
Screen: This blend mode multiplies the inverse of the luminance values of the base layer with those of the blend layer to produce a lighter result.
Color Dodge: Color Dodge lightens the base layer and decreases contrast based on the blend layer's luminance values.
Linear Dodge: This blend mode also lightens the base layer but with more subtle results than Color Dodge.
Overlay: The Overlay blend mode combines the effects of the Darken and Lighten blend mode groups to increase contrast.
Soft Light: This blend mode is similar to Overlay but with more subtle results.
Hard Light: This blend mode is similar to Overlay but with more intense results.
Difference: The Difference blend mode subtracts the blend layer's pixels from the base layer's pixels.
Exclusion: This blend mode also subtracts the blend layer's pixels from the base layer's pixels but with more subtle results than Difference.
Hue: The Hue blend mode combines the saturation and luminance values of the base layer with the hue of the blend layer.
Saturation: This blend mode combines the hue and luminance values of the base layer with the saturation of the blend layer.
Color: The Color blend mode combines the luminance values of the base layer with the color of the blend layer.
Luminosity: This blend mode combines the hue and saturation values of the base layer with the luminance of the blend layer.
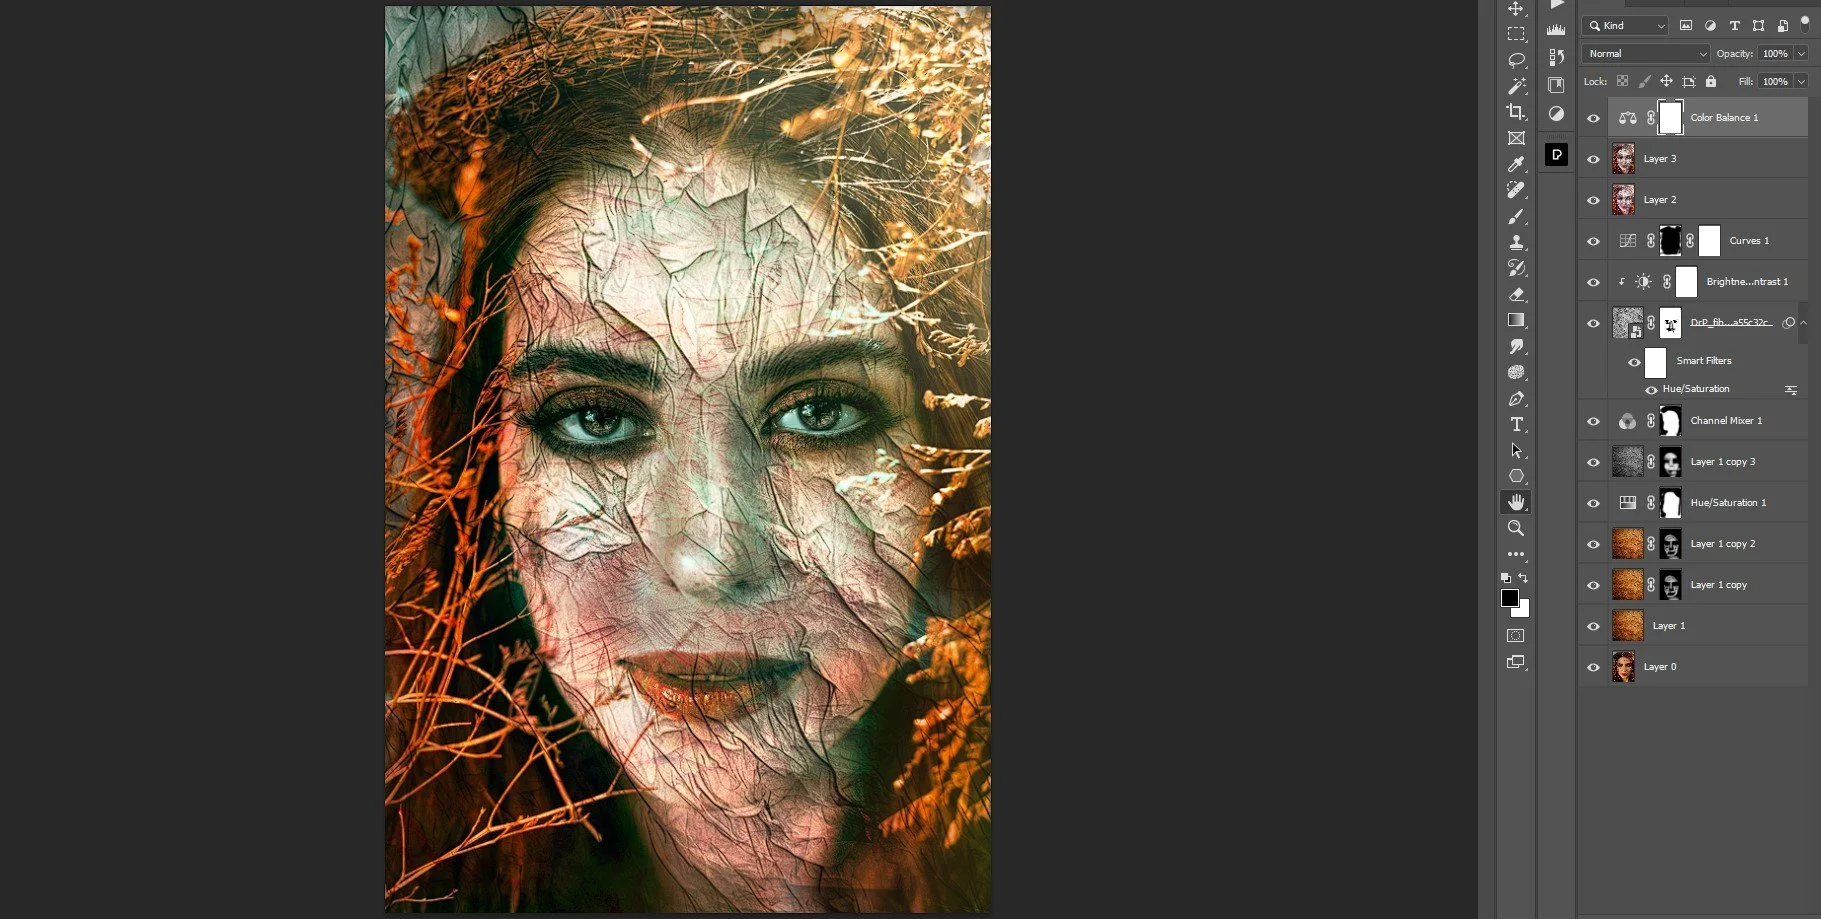
How Blend Modes Affect a Portrait With a Texture
To demonstrate how powerful the Photoshop blend modes are, I’ll overlay a color texture over a portrait and show you how each blend mode changes the image. Keep in mind that the color of the texture and exposure values may have different effects in different parts of the image. Also, if you changed the texture to black and white, you’ll see how the blend modes react accordingly. To add to the possibilities, you can add a color texture to a black-and-white portrait or vice versa.
Setting Up the Layers in Photoshop
Generally, you’ll want to have the texture as the top layer. This makes logical sense in that you may have other adjustment layers that you want to save and not flatten, so adding a Stamp Visible layer and the texture on top would be one way to organize your layer stack. For this example, I’ll just work with two layers to demonstrate how the blend modes work their magic.
Normal
In Normal blend mode, the top layer will only be visible.

Dissolve
In the Dissolve blend mode, there’s no difference either. In some composites, you’ll see a noise profile. I don’t think I’ve ever used Dissolve mode for anything but that doesn’t mean it should be ignored entirely; it’s just the least likely one that would produce a radically different image that would lend itself to fine art photography.

Darken
Now, we begin to see how Photoshop modes can blend two images together for a composite for our fine art photography.

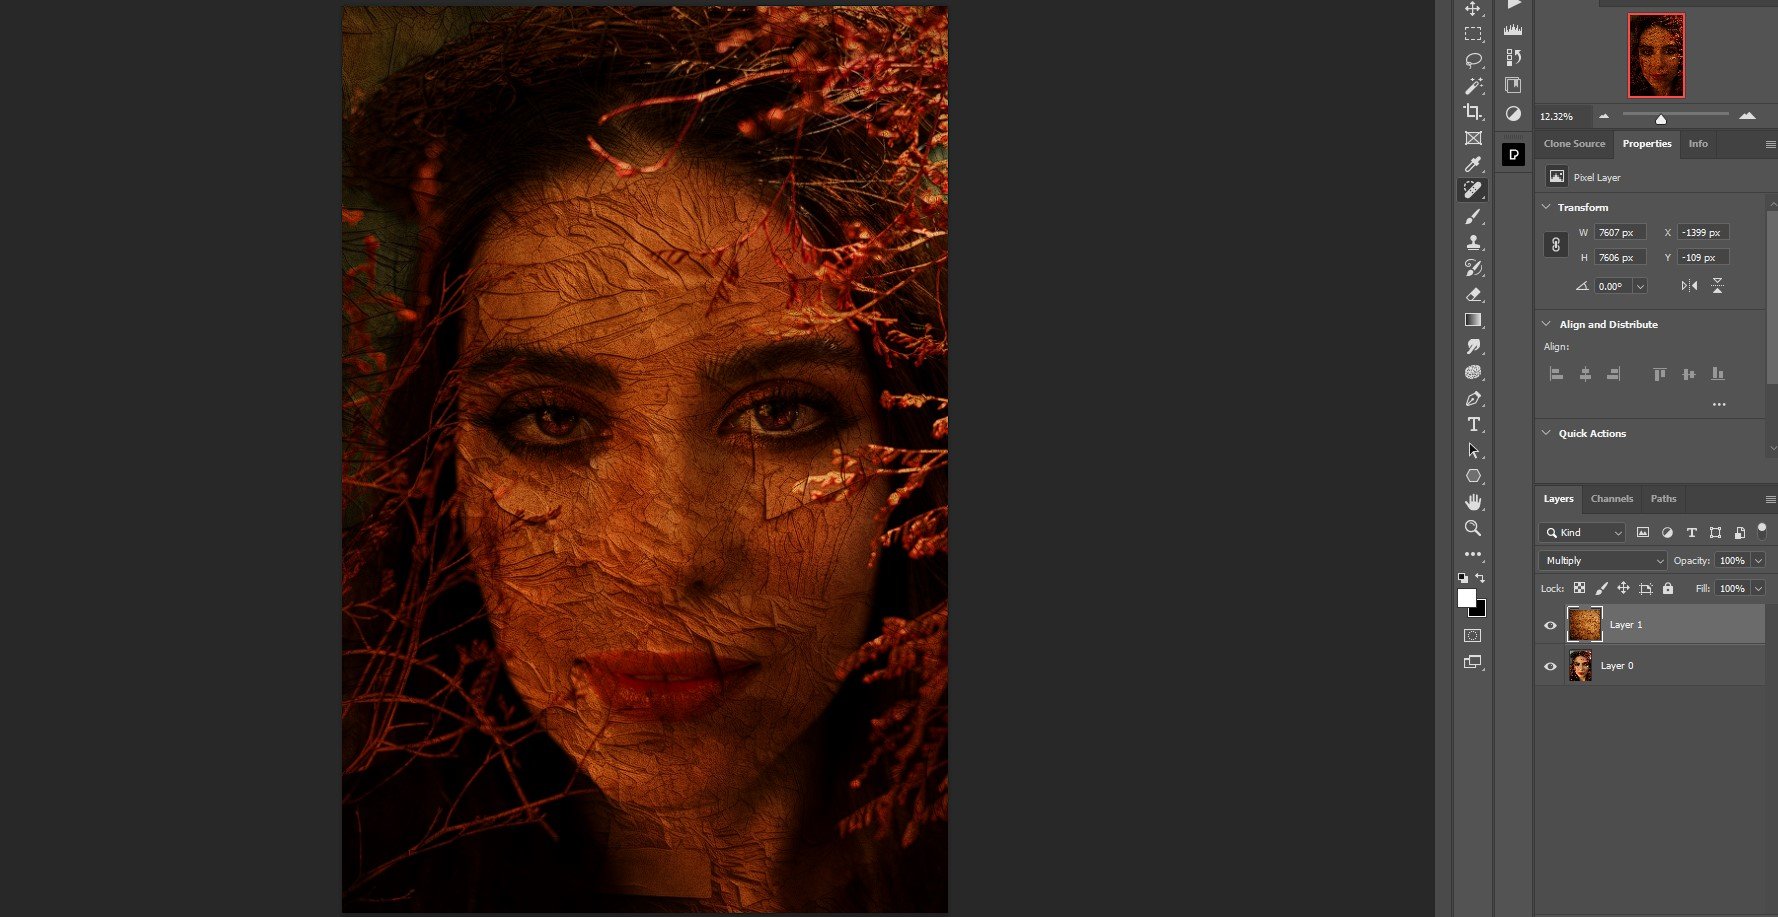
Multiply
Now, we get a darker image with Multiply.
Color Burn
With the Color Burn blend mode, we see more contrast and more saturation.

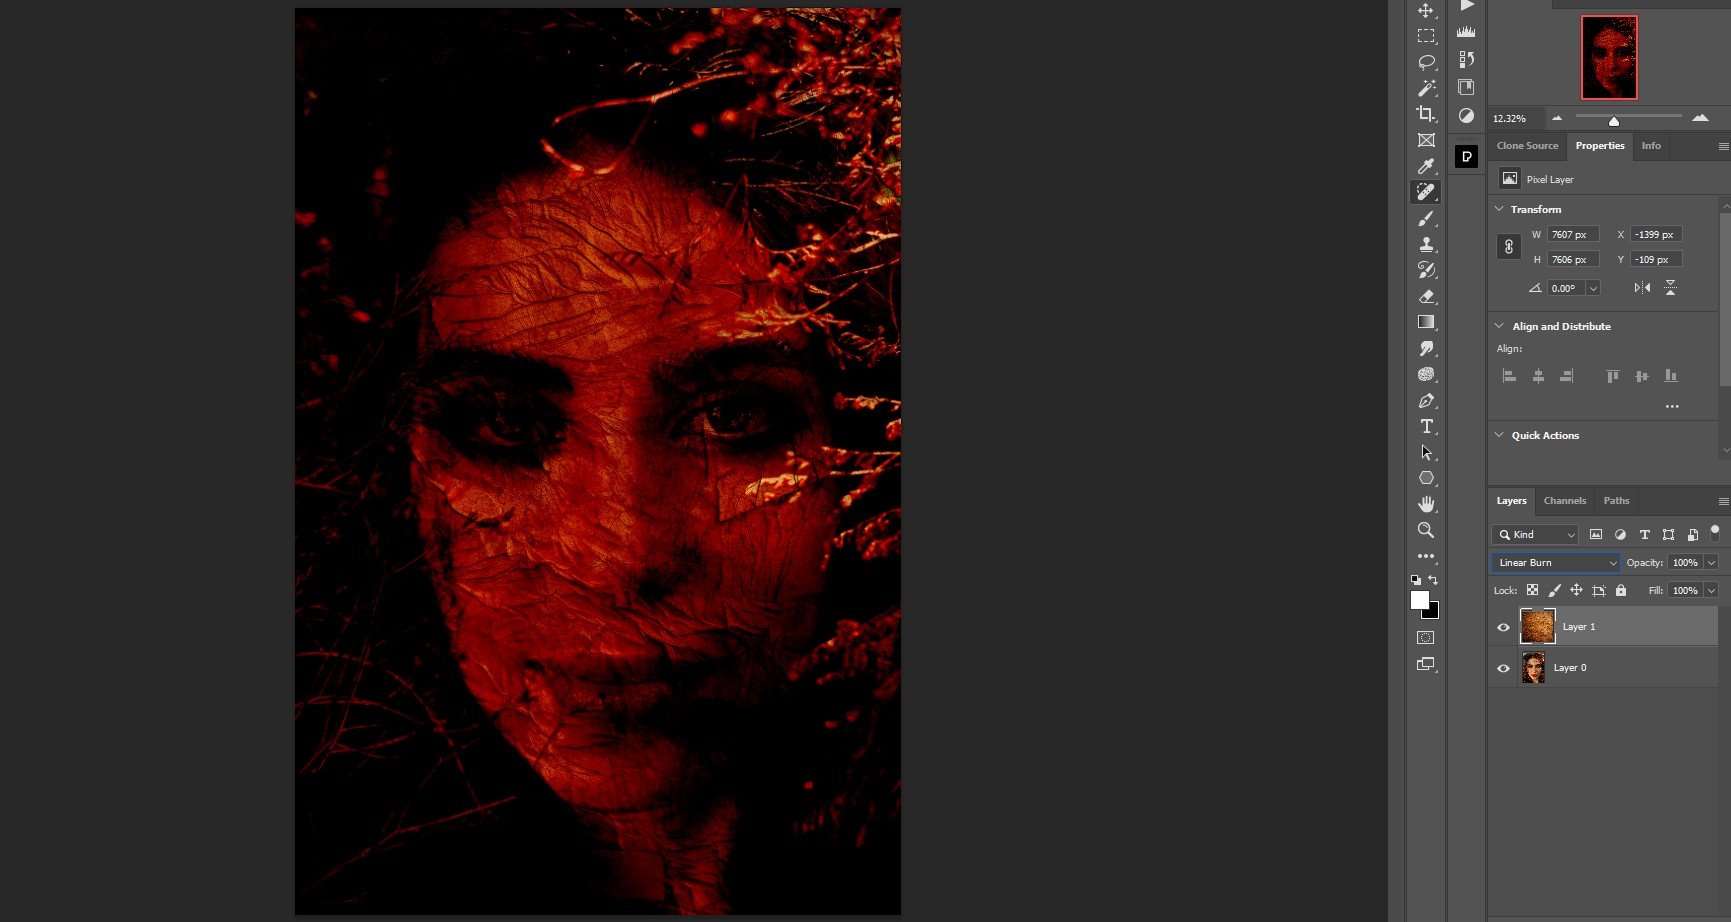
Linear Burn
With Linear Burn, we see less contrast and less saturation compared to the previous image.
Darker Color
Darker Color mode works pretty well with this image without having to make much of a tweak to Opacity or masking.

Lighten
Moving into the Lighten Blend Mode Group, the Lighten blend mode lifts a lot of the darks and shadows. To make this particular image work, you’d probably have to reduce the Opacity and mask out some of the effect.

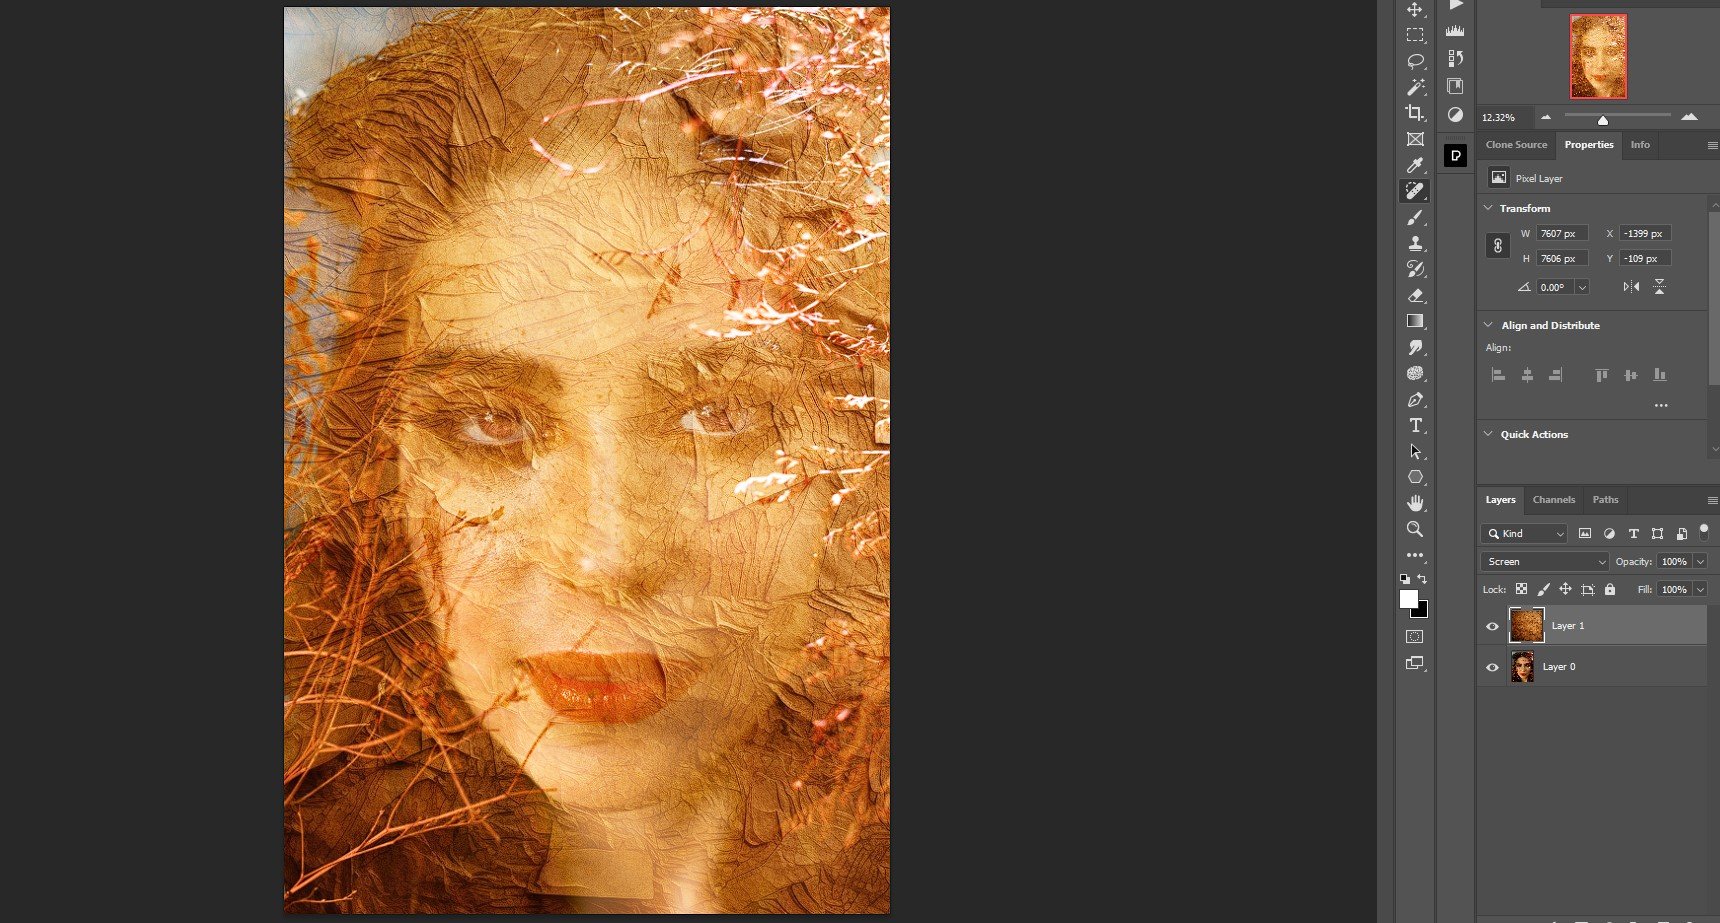
Screen
The Screen blend mode continues to lift shadows and evens out the exposure values a bit more in this image.
Color Dodge
As the name suggests, with the Color Dodge blend mode we see an increase in saturation and contrast. Another instance where Opacity would play an important role if this were to be used on this image.

Linear Dodge
Like most blend modes, Linear Dodge could work for you with some applied masking and an Opacity adjustment.

Lighter Color
Lighter Color evens out this portrait quite nicely. It would be the perfect candidate for masking to bring back some details locally.

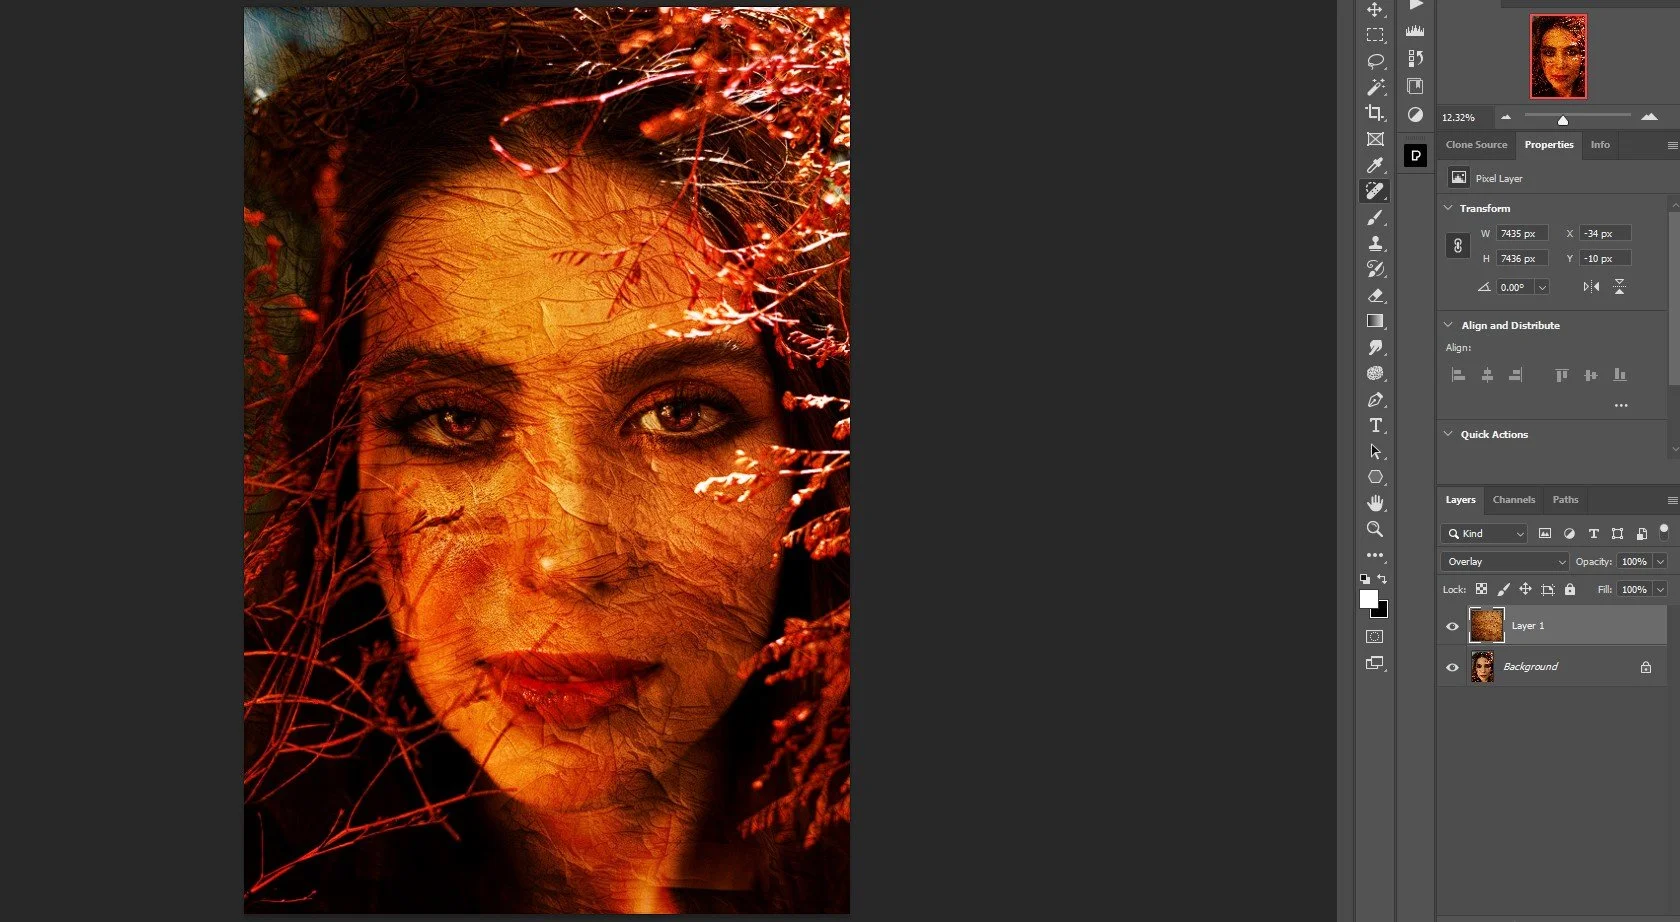
Overlay
The Overlay blend mode is one of my favorites. It manages to retain a lot of detail from both texture and the portrait. It’s always worth having a look at this blend mode for your composites.
Soft Light is another favorite of mine and probably the blend mode that I use the most. It’s not as strong of an effect as Overlay, but it provides better results more frequently that doesn’t require as much editing, in my experience.

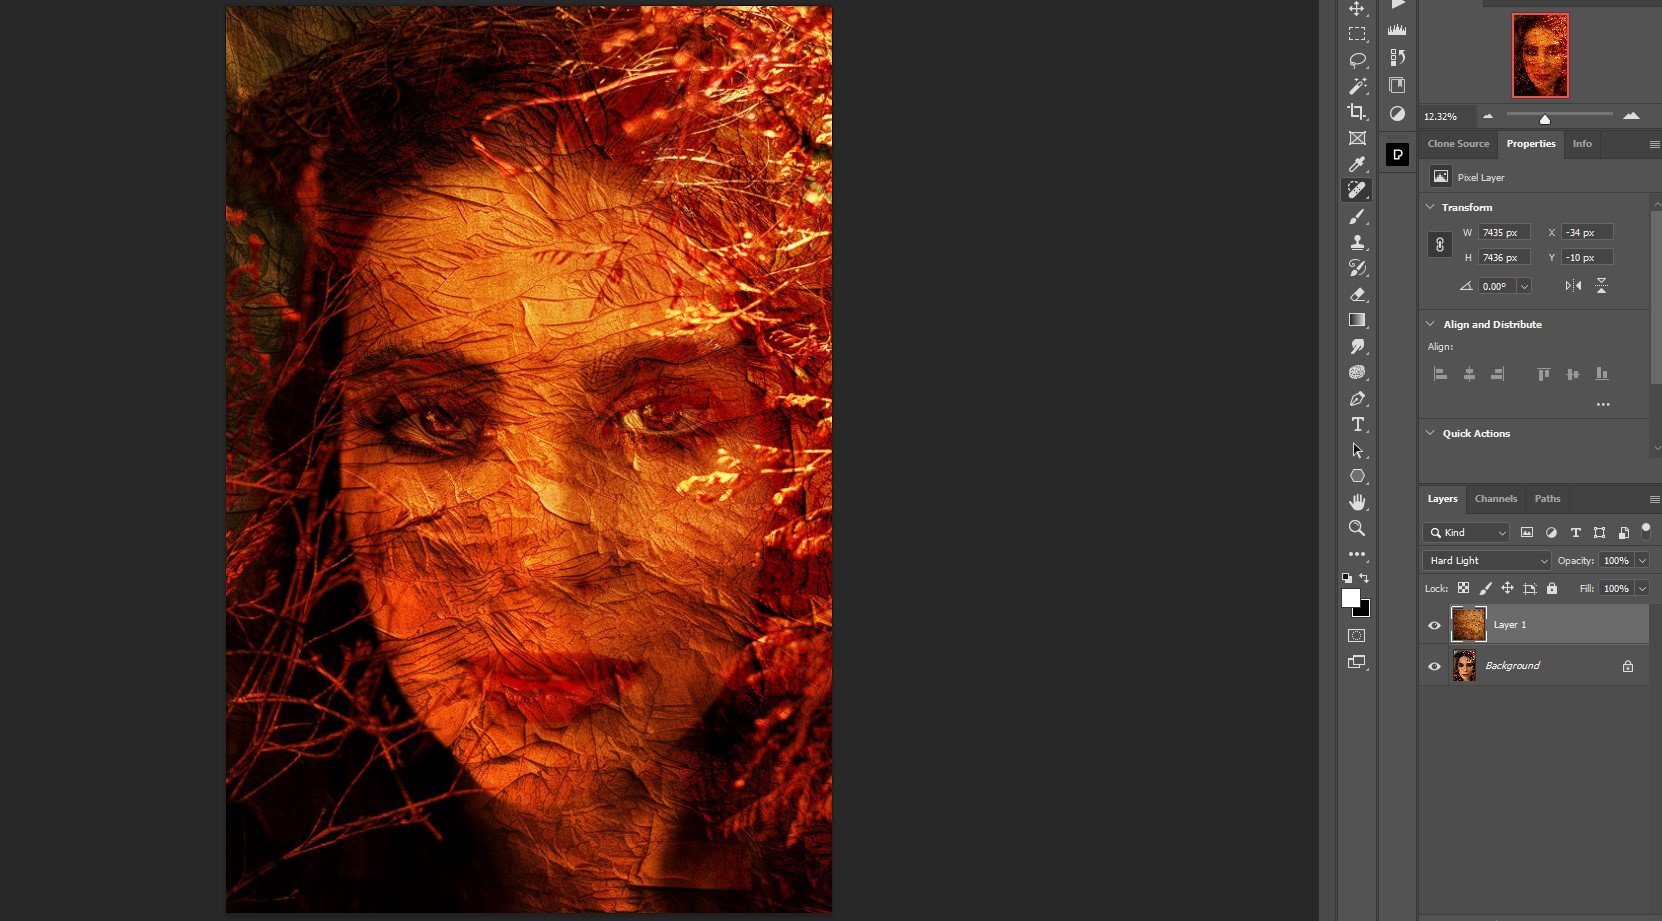
Hard Light
Hard Light is another strong blend mode that can be tamed with Opacity and masking adjustments. It brings out the texture quite a bit in this image.
Vivid Light
Vivid Light is also a very strong blend mode. The secret to these blend modes is that at 100% Opacity, most of them can look bad. The trick is to reduce Opacity, mask, and maybe even add extra texture layers — maybe even using different blend modes and with varying opacities and masking. This is what constitutes advanced and effective compositing.

Linear Light
Another thing to keep in mind is that blend modes like Linear Light may not always look flattering on a portrait. But they may look good on a landscape or some other genre. Experimentation is key.

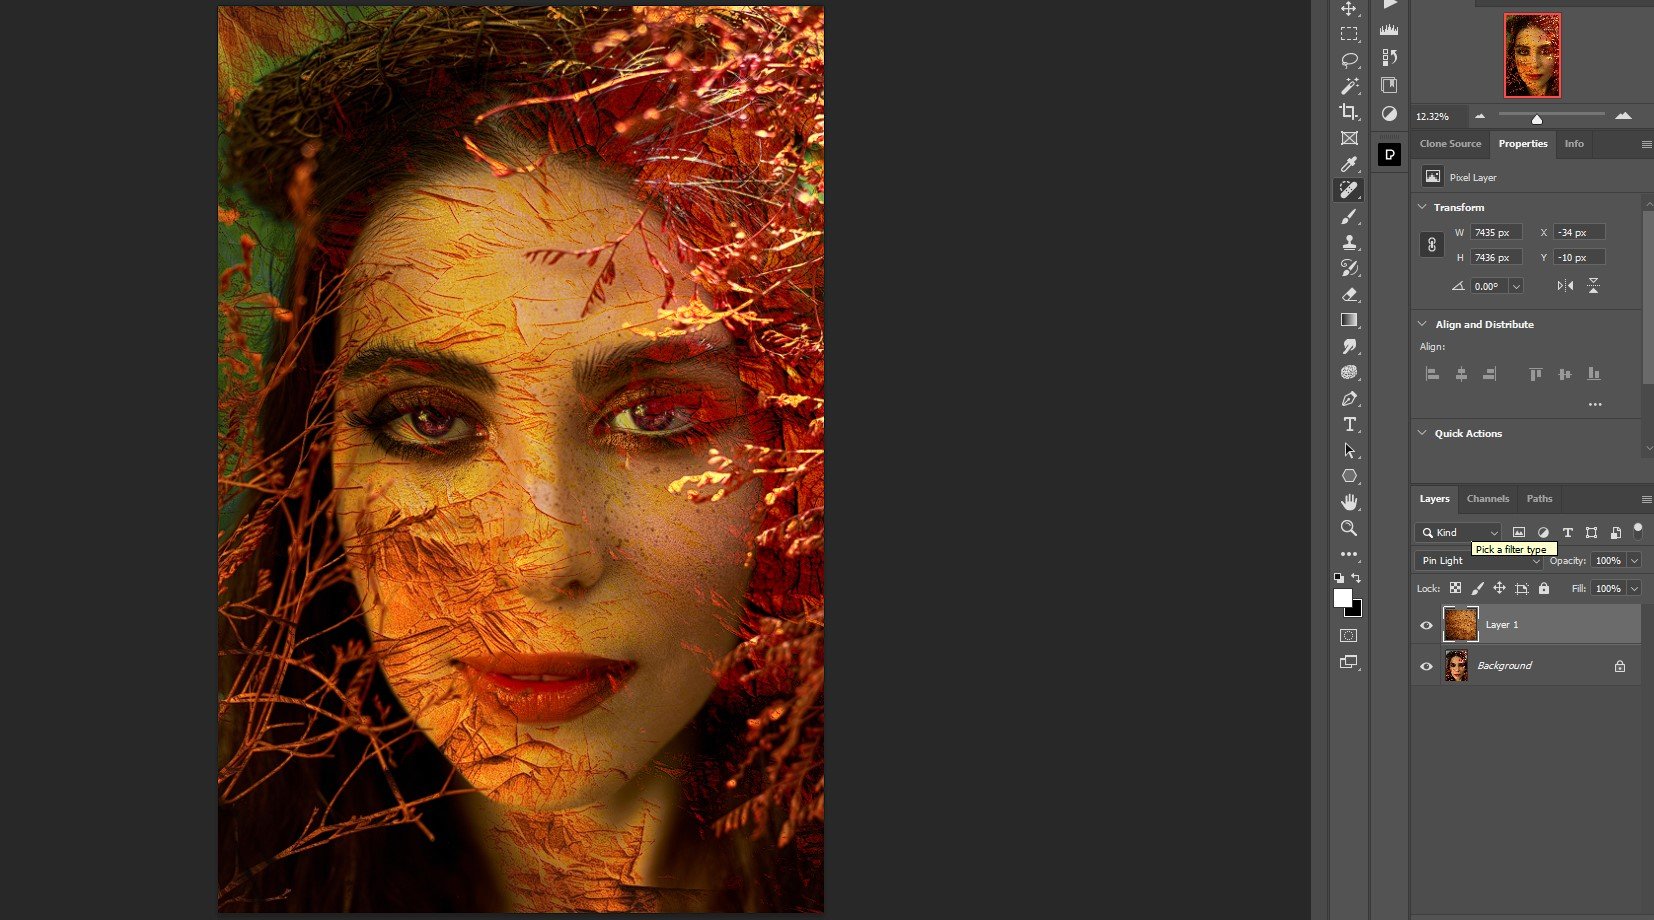
Pin Light
With Pin Light we begin to see another potential blend mode to be used with portraits. Interestingly, it swaps out the color of the original portrait background, which in itself could prove useful.
Hard Mix
I’ll be the first to admit that I don’t use the Hard Mix blend mode at all. I rarely find it helpful in the composites that I’m working on. But again, it’s all about subject matter. If you’re working on a graphic, Hard Mix may come in handy.

Difference
Difference can be useful if you’re trying to change up a color scheme or if you’re stuck. It’s extreme, but sometimes that’s what you need to spark an idea.

Exclusion
Exclusion is a blend mode that can offer another creative path. I used to “exclude” this blend mode but I have experimented with it of late.

Subtract
Subtract is another blend mode that could help you out with ideas. I consider this blend mode group my ‘hail Mary’ bunch because it’s often the last place I go before deciding whether to abandon an edit.

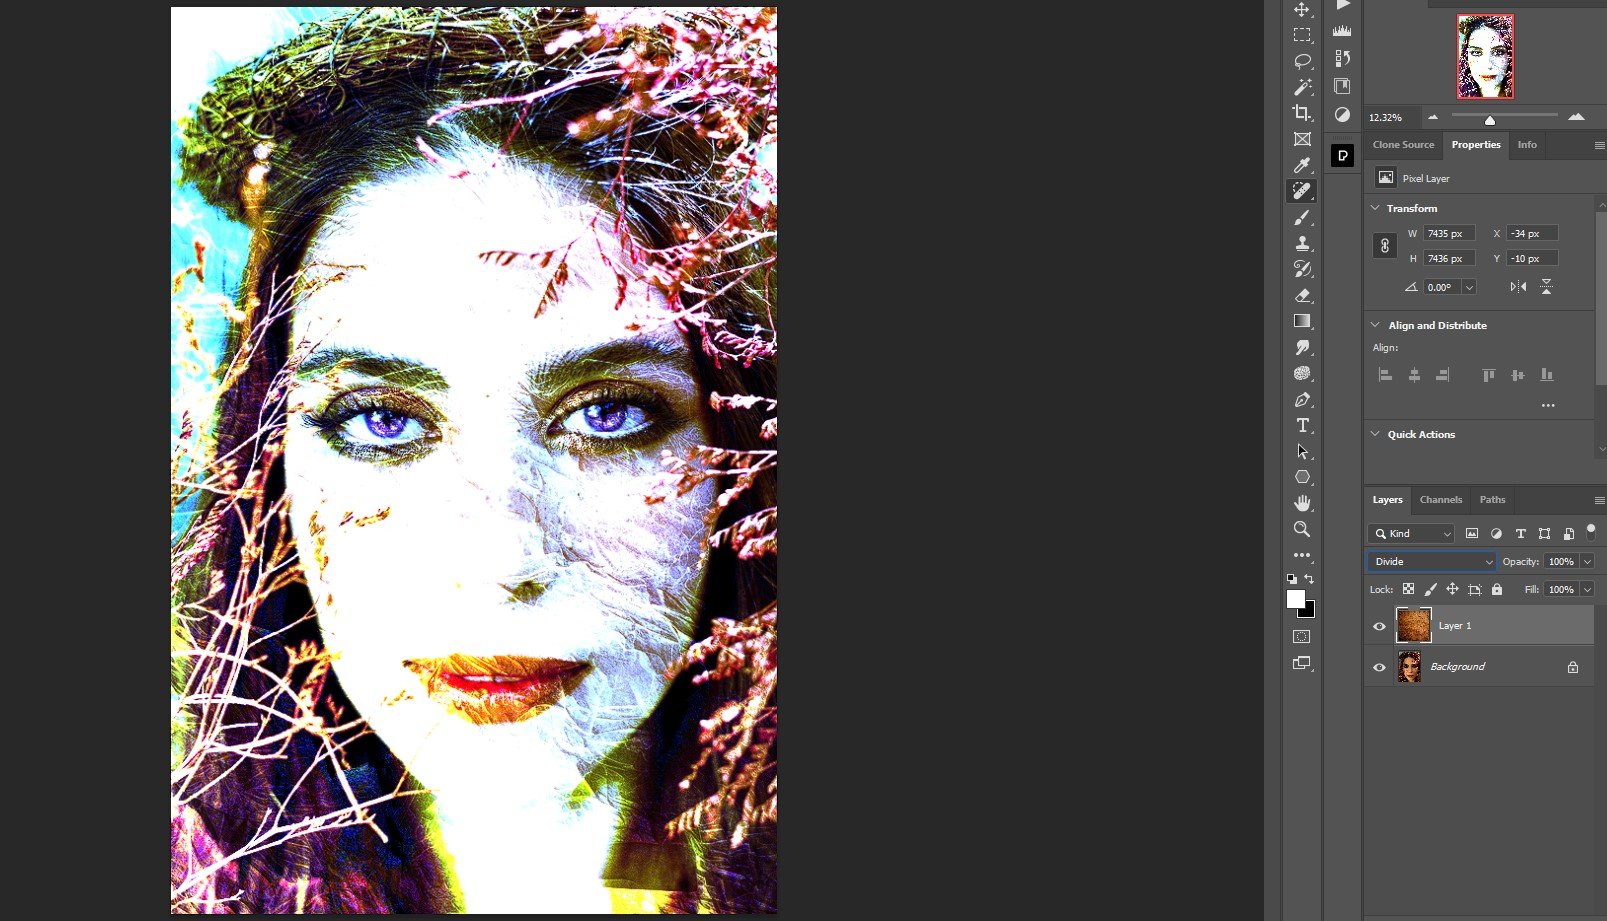
The Divide blend mode also provides an interesting look.
Hue
Hue may seem quite pointless at first since none of the texture is coming through. But what’s fascinating about it is that the color scheme is embedded, sort of like a LUT. If you have a texture with beautiful colors, you may want to use Hue to incorporate the colors and then duplicate the texture and use another blend mode to bring out the texture layer.

Saturation
Saturation isn’t quite the same as the Hue blend mode in that saturation isn’t boosted across the image. The problem (or benefit) is that exposure values are adjusted up or down across the image too, making for some potentially unexpected results.
Color
Color is very similar to the Hue blend mode but not as nice when applied to this portrait.

Luminosity
Last and probably least, in my opinion, is Luminosity. It basically kills the underlying image and applies color to the texture layer. To be fair, you can still see a trace of the woman but seldom will it come in handy for your compositing.

It’s Vital to Experiment With Blend Modes in Your Composites
It’s important to realize that there are no rules. Some of the blend modes I like you may despise. Once you become familiar with the blend mode names and their tendencies, experiment with them. I’ve alluded to some of these points already, but here are a few things to try when you enter the world of compositing.
Try out all the blend modes and discover your favorites.
Opacity is your friend. Sometimes a blend mode can be too strong at 100% but can be quite useful reduced.
Masking is another essential ally. In tandem with Opacity adjustments, it can open new worlds.
Duplicate texture layers / try different blend modes for each. There are no limitations.
Mix different textures. Combined with varying blend modes, this method offers a lot of creative freedom.
Convert texture to black and white if you don’t want to introduce additional colors.
Start a collection of textures, preferably ones that you photograph or create digitally
This is a decent overview of how I work with blend modes and textures in Photoshop. Using the above methods with a few other edits, I came up with this.